Learn how to design and build a PCB- SMD circuit board design
Scroll to the bottom to watch the YouTube tutorial.
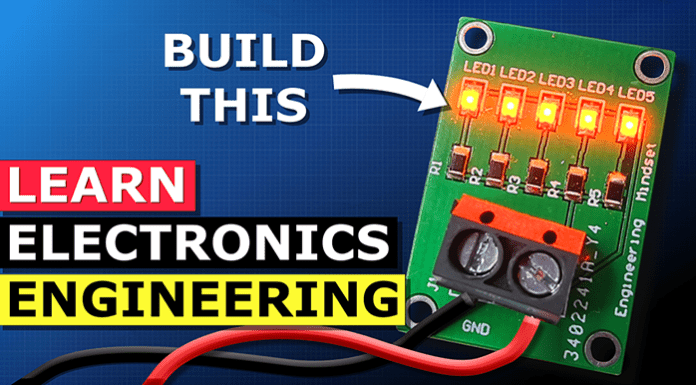
I’m going to show you how to design and make your very own version of this circuit board. It’s perfect for learning electronics and you can even download my design files for free HERE and order the circuit board yourself HERE.
Designing the Circuit
For the power supply I will use some standard 1.5V batteries. I’ll use this battery holder to combine them and create a 3 Volt supply for the circuit board. The multimeter shows slightly more than 3 volts as the batteries are new.
For the lights, we have two main options. Standard through hole LED’s or SMD type LED’s, which stands for surface mount device. We can see a standard LED here, and next to it is a SMD LED, I’ll zoom in so you can see it. Here you can see it next to a scale so you can really see just how these components are. However, it can produce a good amount of light. So I will use 5 of these, as that will keep the circuit board simple and also fairly small.
The SMD LED’s are tricky to handle, you’ll need some tweezers for that. My top tip is to handle them on a flat dark coloured surface, because if you drop them on carpet, you’ll probably never find it again.
As a quick test- how many objects can you see in this carpet? Tell me the grid reference for them and let me know your answer in the comments section down below.
The SMD LED typically has a small dot on the top, although you might need a microscope to see it though, BUT! Sometimes manufacturers use this to indicate the anode and other times it indicates the cathode. So, always check the manufacturers datasheet or test it yourself. Here we can see the LED illuminates when the positive is connected to the dot. On the back you should find a symbol also, again this could be either anode or cathode, so check the datasheet or test it. Here we can see the LED illuminates when connected like this.
To find the LED’s go to a supplier website and search through their components. I like these ones because they have a PCB footprint which we can use later, we can also see that this LED has an orange light, it has a forward current of 20 miliamps and a forward voltage of 1.9V. Importantly, the forward voltage is less than the 3V supply we are going to use, that makes our circuit board design very easy.
So, now we have two options, we can connect the LED’s in series or parallel. If we connect them in series, then each LED is going to remove an additional 1.9V, so that means we need a 9.5V power supply to the circuit board, to be able to power them all, so we can’t use this method. We will instead connect them in parallel, so that each LED receives the same voltage, then we would only need a 1.9V supply then, but we will use a 3V supply.
By the way, we have covered series and parallel circuits in detail in our previous articles, check them out here- PARALLEL and SERIES
Now, if we provide an LED with 3V, and it’s only rated to handle 1.9V, then we’re going to destroy it. Too much current is going to flow through the component and it will burn out. So, we need a resistor to limit the current and remove the excess voltage.
What size resistor do we need? Well, we have a 3V supply and the LED has a voltage drop of 1.9V, so if we subtract this from the power supply, then we have to reduce the voltage by 1.1V. The LED’s are rated for 20 milliamps or 0.02 Amps, so 1.1Volts divided by 0.02Amps gives us a resistance of 55 Ohms.
By the way, we have also covered Ohms law in detail previously, check it out HERE.
So we also need to know the power rating of the resistor. We calculate that from the current of 0.02Amps squared multiplied by 55 Ohms, which gives us 0.022 Watts and that is a very small amount, which is a good thing. Because that’s how much energy we’re wasting as heat from the resistor. To remove that excess 1.1Volt, we basically convert the energy into heat to remove it.
Ok, so we want to use SMD components so we search the supplier website and I will use this one, it is rated for 56 Ohms, so slightly higher than we need but close enough. It has a tolerance of 1% meaning it could be anything between 55.44 Ohms or 56.56 Ohms. When I test this one, it’s showing 56.3 ohms. We can also see that this resistor is also able to handle up to 125 milliwatts which is much higher than our 22 milliwatts design, and this component also has a drawing as well which we can use in our design.
So we will use this component. These resistors are also incredibly small, so you’ll need some tweezers to handle them. We don’t need to worry about the polarity, because they will work either way we connect them.
So we will have 5 LED’s in parallel with a resistor connected to each one.
Next we need a way to connect the battery pack to the circuit, we could just solder them but I’m, going to use a terminal block so that we can easily connect to different power sources, in future, if we needed to. We only need a positive and ground connection, so we will use this model right here.
Now to design the circuit board.
Designing the Printed Circuit Board
We’re going to be using Altium designer who have kindly sponsored this article, all of our viewers can get a free trial of the software HERE.
So we start a new project, and then add in the symbols of the components we found. I use an add on to do that, just input the part number. We only have three different components. The LED, the resistor and the connector.
We join the LED and resistor and then duplicate it. Then we connect the resistors together and join it to the connector. Then connect the LED’s together and join it to the connector also. Then we define the ground and positive points of the circuit. Next we just add the annotations to the board. Then go to the PCB layout and import the components.
Drag the connector into place. I’d also say check it in 3D to ensure it’s facing the correct way. Then move the LED’s into position and align them. Next, move the resistors into place and align them also. You can move the text if you wish. I’ll also add some holes so that we can mount the circuit board if we need to, and then adjust the position of the components.
Then we define the positive and ground ports on the board. Now we start to draw the routes between the components. Connect the resistors and LED’s first. Then all the resistors together and connect that to the positive port. Then connect all the LED’s together and connect them to the ground port. Finally, set your polygon. And the PCB now looks like this, so can export the project.
To order our PCB we just head to JLCPCB who have also kindly sponsored this article. They offer exceptional value with 5 circuit boards from just $2, order HERE. And also don’t forget you can download my circuit board design file for free HERE.
So, we upload our gerber files and check the preview, it looks good, so we can then select the colour although I will stick with green and then head to the checkout. A few days later our circuits arrive in the post and we can start building the circuit.
So, get your components ready. We will use some solder paste, you can buy this online HERE. Now unless you have incredible vision, which I don’t, you’ll need a microscope or you could use your smart phone to zoom in and see the board and components.
So all we need to do is put a small amount of paste onto each of the solder pads on the board. Then we start to add the components. I’ll add the resistors first as they are the easiest. You’ll need some tweezers to get them positioned correctly and also push them into the paste. It should then look something like this. Now for the LED’s, make sure you align them currently. To do that, you need to check the manufacturers data sheet. So, we just align all your LED’s the correct way, until it looks something like this.
Now we need a heat gun, I’m using this one, and I set it to around 300-400 degrees Celsius with a medium wind speed. Then slowly move the heat gun around so that the solder begins to melt. It will lock all the components into place and it should leave you with a very nice finish. So we should have a circuit board that looks like this.
Then we just need to solder the power connection to the board and we end up with something like this. Then we connect the battery pack to the board and then we insert the batteries and the board lights up. You can even add a switch if you like. So, there we have it, our very own simple circuit board light using SMD and throughput components.








Hi,
What would you recommend for a good professional mulitmeter ?
Saw the links down in the video description but don’t think they work.
Thanks,
Lucas
couldnt you have just used one resistor on the main wire to lower the vol.tage?