Batteries, we use these everyday all over the world, but how do they work? That’s what we’ll be covering in this article which is sponsored Squarespace. Head to squarespace.com to start your free trial or use code engineeringmindset to save 10% on websites and domains.

Scroll down to the bottom to watch the YouTube video.
What is a Battery?
A battery is a device used to store energy for when we need it. We use them to power small electrical devices such as flashlights. The energy is stored as chemical energy and this can be turned into electrical energy when we need it. We’ll see how that works a little later in the article.

If we look at a simple battery and lamp circuit. To illuminate the lamp we need electrons to flow through it. The battery is going to provide the pushing force which allows the electrons to flow through the lamp. We simply need to connect the lamp across the positive and negative terminals of the battery to complete the circuit. The battery can only push the electrons for a certain amount of time though, this time depends on how much energy is stored inside the battery and how much is demanded by the load.

When we talk about load in an electrical circuit we mean any components which require electricity to work, these could be things like resistors, L.E.D’s, DC motors or even entire circuit boards. Some batteries can be recharged and it will clearly state this on the side, but the typical household alkaline battery can’t, so this is simply disposed of when it runs out of energy. These can be recycled, so ensure you dispose of them responsibly.
By the way, If you want to learn how a DC motor works then we’ve covered that in great detail previously- check it out HERE.
What’s Inside a Battery?
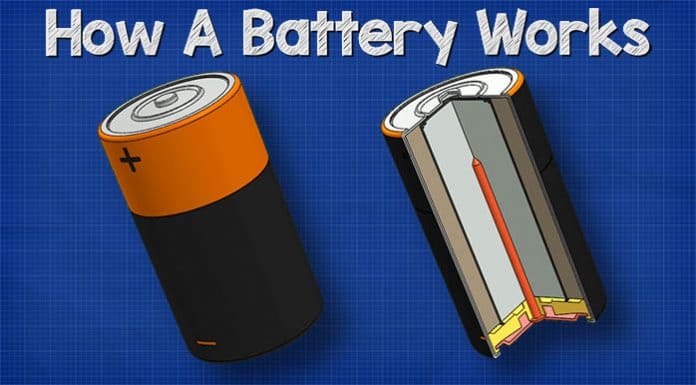
A typical 1.5V alkaline battery looks something like this, but the colours will vary by manufacturer. When we look at the battery, we usually have a plastic wrapper fitted tightly to the outside, this will insulate the battery but also tell us important information such as the capacity and voltage as well as which end is the positive and negative.

The positive end is known as a cathode and will have this extended surface which protrudes outwards.

The negative end will be flat, the negative end is known as the anode. These two terminals are electrically isolate from each other.

Under the wrapper we find the main casing, which is usually made from steel with a nickel plating. This holds all the internal components in place and stops them interacting with elements of the atmosphere such as air and water.

Within the casing we have multiple layers of different materials, these materials are specially selected because their chemical reactions create certain levels of voltages and current. The first layer is the cathode which is a mixture of manganese oxide (MnO2) and graphite. This material is in contact with the metal of the positive terminal. The graphite is added to improve the conductivity of the mixture and increases the energy density.

Next, we find a layer of porous material, typically a fibrous paper which forms a barrier. The barrier prevents the anode and cathode materials from having direct contact with each other, this helps the battery last longer when it’s not being used. If the barrier wasn’t there then the battery would short circuit. The microscopic holes within the material allows ion atoms to pass through it. We will look at that in more detail later in this article.

An electrolyte liquid of potassium hydroxide is then sprayed onto the seperator during the manufacturing process which soaks it and will be absorbed into the anode material. The electrolyte used is an alkaline which is why we refer to this type of battery as an alkaline battery.

On the other side of the barrier we have the anode which is a paste made from zinc powder (Zn) as well as a gelling agent. The gelling agent just keeps the zinc suspended so it doesn’t accumulate in one spot. The zinc is in a powder form to increase the surface area of the material which lowers the internal resistance and thus improves electron transfer.

The steel capsule is sealed with a nylon plastic cap. A brass pin is then inserted into the zinc with a steel cap placed over this. This gives us the negative terminal. Notice that the positive and negative terminals are separated by the plastic cap. This ensures they are electrically isolated from each other, otherwise electrons could flow through the casing to reach the positive terminal and short circuit the battery.

Electricity Fundamentals
We need to understand some fundamentals of how electricity works before we can understand the battery.
Firstly, electricity is the flow of electrons in a circuit. Batteries can provide the pushing force that moves the electrons through the circuit. The electrons want to get back to their source, and they will immediately take any path that’s possible to achieve that. By placing things such as lamps in the way of the electrons we can force them to do work for us such as illuminate the lamp.

Batteries produce DC electricity or Direct current. This means the electrons flow in just one direction from the negative to the positive. An oscilloscope will show DC as a flat line in the positive region. You can think of DC electricity like a river which flows in just one direction.

In these animations we show electron flow, which is from negative to positive but you might be used to seeing conventional current which is from positive to negative. Electron flow is what’s actually occurring but conventional current was the original theory which is still widely used and taught to this day. Just be aware of the two and which one we’re using.

The electricity you get from the power outlets in your homes provides AC electricity or alternating current, this is different than the electricity provided by a battery. With Alternating Current the electrons flow forwards and backwards continuously much like the tide of the sea which flows in and out between high tide and low tide. An oscilloscope will show AC as a wave running through both the positive and negative regions because it’s flowing forwards, that’s positive, and backwards, that’s negative.

If we look at a section of copper wire, inside this we find copper atoms. At the centre of an atom we have protons and neutrons, the protons are positively charged and the neutrons are considered neutral so they have no charge. Orbiting these are electrons, electrons are negatively charged.

Some of these electrons are free to move to other atoms. They will naturally move between other atoms but in random directions, which is of no use to us. We need lots of electrons to flow in the same direction and we can do that by providing a voltage difference from a power source such as a battery.
When we talk about atoms, you will often hear the term Ion used. An Ion is just an Atom which has an unequal amount of electrons or protons. An atom has a neutral charge when a it has the same number of protons and electrons, because the protons are positively charged and the electrons are negatively charged, so they balance out. If the atom has more electrons than protons then then it’s a negative ion. If the atom has more protons than electrons, it’s a positive ion.

Voltage is like pressure in a water tank. To know how much pressure we have, we must compare the pressure inside the pipe to the pressure outside, and we use a pressure gauge to do that. When it comes to voltage, we use a voltmeter to measure the difference in voltage between two different points. If we measure the difference across the battery, we get 1.5V, but if we measure the same end then we get 0V because it’s the same end so there’s no difference.

Some materials allow electrons to pass through easily, these are known as conductors. Copper and most metals are examples of this. Other materials do not allow electrons to pass through, these are known as insulators. Rubber and most plastics are examples of this. That’s why we use copper wires with rubber insulation. The copper transports the electricity to where we need it and the rubber keeps us safe.
By mixing certain materials together we can cause chemical reactions. This is when the atoms of one material interact with the atoms of another material and during this interaction atoms will bond together or break apart, electrons can also be captured or released by atoms during the chemical reaction.
OK, now that we have the basics covered, lets look inside a battery and see how it works.
How Does the Alkaline Battery work?
Remember we talked briefly about atoms. Well all these materials inside the battery are made from lots of different atoms tightly packed together. These are represented by the coloured balls, each colour representing a different material and therefore a different atom, for our very simplified example. When we combine all these materials together inside the capsule, we’re going to get a small chemical reaction where the atoms start to interact with each other.

First of all, a hydroxide ion atom within the electrolyte is going to join with a zinc atom in the anode section. This chemical reaction is known as oxidation and will create Zinc Hydroxide, as the zinc and hydroxide combine it will release electrons. These electrons are now free to move and they will collect on the brass pin.
At the same time, a manganese oxide atom is going to join with a water molecule from the electrolyte as well as a free electron in a chemical reaction known as reduction. During the chemical reaction the manganese oxide turns into a slightly different version of manganese oxide, this version no longer needs a hydroxide ion atom so it will eject this into the electrolyte. The water atom is replaced by one ejected from the oxidation reaction. The hydroxide ion is now free and able to pass through the separator. But for now it won’t because there is no room for it in the anode section.

So as you can see we have a build up of electrons at the negative terminal. As electrons are negatively charged, and we now have more electrons at the negative terminal compared to the positive, this means we have a voltage difference between the two ends and we can measure that difference with a multimeter.
Remember we can only measure the difference in voltage between two different points. If we measure the same point we would get zero volts because there is no difference.
Electrons repel each other and want to move to a region with less electrons. The positive region has less electrons, so they will try to reach this terminal. The separator prevents them from flowing inside the battery to reach the positive terminal.
Therefore, the electrons need another route. If we provide the electrons with an external path, such a wire, the electrons will flow through it to get to the positive terminal. By placing things such as a lamp in the way of the electrons, the electrons will have to pass through this and so we get them to do work for us, such as illuminating a lamp.

As long as we have a complete circuit between the terminals, the chemical reaction will keep occurring, and electrons flow from the negative terminal. If we remove the wire or break the circuit then the chemical reaction stops.
So let’s recap on the chemical reaction that’s occurring. The free electrons are entering the battery through the positive terminal. This combines with the manganese oxide and a water molecule at the cathode which releases a hydroxide ion into the electrolyte.
The hydroxide ion passes through the separator and joins with a zinc atom to create zinc hydroxide and as this happens electrons and a water molecule are released. The electrons want to get to a region with less electrons, the positive terminal has less electrons so they will flow through the wire to reach this and so the chemical reaction repeats again and again continuously.
However, there’s only a certain amount of material inside the battery so over time it’s going to become harder and harder for the chemical reaction to continue and eventually no more electrons will flow. The battery will now be of no further use and needs to be disposed of.
Connecting Batteries Together
We can use a battery to power some components, but usually a single battery isn’t enough to power our devices, for that we need to combine batteries.
We can connect batteries in two ways. Series or parallel. We have covered these circuit types in great detail previously, check out Series HERE and Parallel HERE.

When we connect the batteries in series, the voltage of each battery is added together. So two 1.5V batteries gives us 3V, and 3 batteries gives us 4.5V etc. The actual voltage maybe slightly different in the real world. The voltage increases because each battery is boosting the electrons that enter it, so we get a higher voltage.

If we connect the batteries in parallel then we will only get 1.5V regardless of how many we connect. That’s because the path merges at the supply but splits at the return, so the electrons will not be boosted. However, this configuration type will be able to provide more current and it will also have a larger capacity so we can power something for longer. For example, If the battery had a capacity of 1,200mAh and we placed two in parallel, we will have a capacity of 2,400 mAh but a voltage of 1.5V. If we wired them in series, we have a capacity of 1,200mAh but a voltage of 3V.

Capacity
We use batteries to power our circuits. But how long can a battery power our circuit for? When we look at the packaging or data sheet for a battery we see a value with the letters m.A.h next to it. This is the milli Amp hour rating.

For example, this one has a rating of 2500 mah. That means it could theoretically provide a current of 2500 milliamps for an hour, or 1250ma for 2 hours or 20ma for 125 hours. However, in real life it probably won’t actually last this long because the chemical reaction slows, so the internal resistance of the battery changes as it empties. There are lots of other things that affect this such as age and temperature.
There’s no real way to precisely calculate the life span, the best way is to simply test it. We can however make an estimate of the life span with the following formula:
Battery life = Capacity (mAh) / circuit current (mA).
We have built a free simple calculator on our website where you can estimate the run time of a battery as well as the required capacity. Do check that out HERE.
So for example, in this circuit we calculate a demand of 19ma and the battery has a capacity of 3000mAh. So 3000 / 19 gives us 157.9 hours. This is really the best-case scenario though and in reality it almost certainly won’t achieve this.

How to Measure With a Multimeter
To measure the voltage, we simply select the DC function on our multimeter, and then we connect the red lead to the positive terminal and the black lead to the negative. This will give us a voltage reading.

You can see this battery is rated at 1.5V but when we test it we get 1.593V

When the battery is dead we get a lower voltage, this one reads 1.07V so it’s completely dead.
However, sometimes we could still get a voltage of around 1.5V even if the battery is dead.
To fully test the battery, we need to test it under a load condition to check if it’s still useful. For that we need a resistor.

So we take a resistor of around 100 Ohms, it doesn’t have to be exactly this value though, but we connect the resistor between our two probes. In this case we’ve just used some crocodile clips to connect the resistor between the probes, like this.
This way current will flow through the resistor and we can take a voltage reading as this occurs. If the battery is still good, then the voltage level will only drop slightly.

For example this battery has a rated voltage of 1.5V, with no load it is 1.593V, with the resistor connected it is 1.547V so this is still good.

This battery is also rated at 1.5V, when we measure it with no load it has a reading of exactly 1.5V, but when we connect the resistor it drops to 0.863V so we know this has run out of charge.

But now that you’re all charged up, checkout squarespace.com to create your own online web presence which is packed with features to empower individuals to launch, share and promote their own projects.
There’s powerful blogging tools to showcase your projects photos, videos and progress updates.
You can easily schedule appointments for classes and sessions with team members and clients through their built in tool. And you can even collect payments or donations to help support your cause.
Head to squarespace.com for a free trial, and when you’re ready to launch, go to squarespace.com/engineeringmindset to save 10% off your first purchase of a website or a domain.










Very informative Artical
Detailed one, keep on writing articles related to engineering Paul.
I am flabbergasted by how well written this article is. It is so unassuming and explains everything in such a clear way. I appreciate the plenty of well annotated diagrams as well; they’re such a helpful reminder. Great work and thank you!
Cathode is negative and anode is positive
That’s very perceptive. You’ve come a long way with this one.
Great info thanks.