

Learn about the standard padlock to understand the main parts, how they work and also how to bypass the mechanical security features to pick the lock.
With thanks to Squarespace for sponsoring this article. Go to Squarespace.com for a free trial and when you’re ready to launch, go to http://squarespace.com/engineeringmin… and add code “ENGINEERINGMINDSET” at checkout to save 10% off your first purchase of a website or domain.
Scroll to the bottom to watch the YouTube Video
The Padlock

Padlocks come in many shapes colours and sizes. They have been around for hundreds of years, ranging in complexity of design by different people and civilisations depending on the technology and manufacturing processes they had available. With the industrial revolution came the mass-produced padlock which eventually settled on a pin tumbler design. Called so because inside are some pins and a barrel which rotates or tumbles over.

These are strong mechanical locks which are easy to mass produce and we find them used for everything from keeping our bikes where we left them to symbolising the everlasting love between two people on a bridge, and then throwing the key away to ensure it can’t be undone. But these types of locks, especially the cheap ones, can be unlocked without a key if you know the correct method and once we understand how the lock works we’ll learn how to pick the lock.
How the Padlock Works
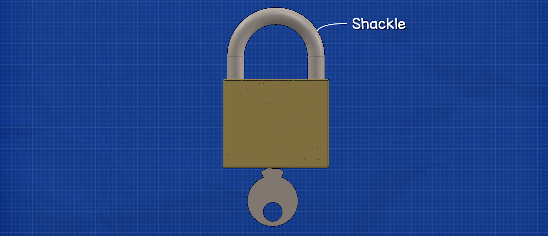
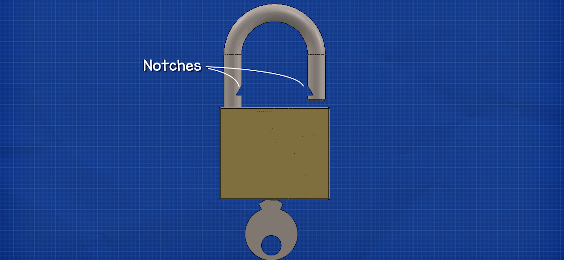
When we look at a padlock the most noticeable feature is the U-shaped shackle at the top. In the unlocked position, one end of the shackle pops out of the main body allowing this component to rotate freely. On the inside surface of the shackle we will find two notches. These form part of the lock mechanism and we’ll see that part shortly.
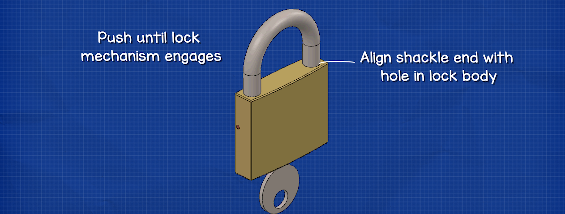
To lock the padlock we simply align the end of the shackle with the hole in the lock body and push these together. You’ll feel the internal locking mechanism engage and click into place, the shackle will now be unable to leave the body of the lock. To unlock the padlock we need to insert the correct key into the key hole at the bottom of the lock body, and rotate the key until it releases the shackle.
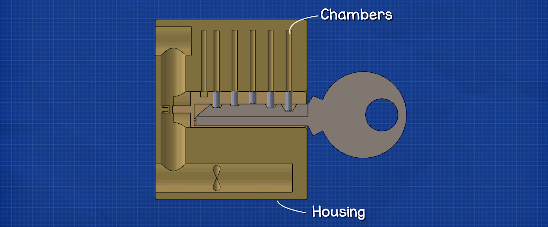
When we look inside the padlock body, we can see the locking mechanism.

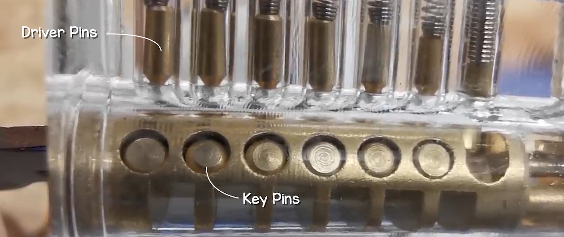
The first part is the plug. The key will slide into the plug and follow the groves to ensure a smooth transition.

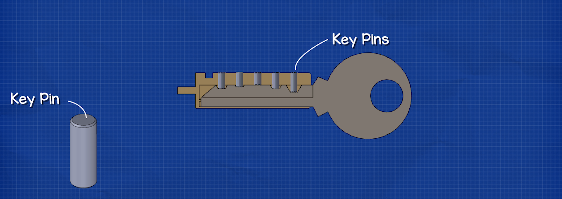
When the key is turned, the plug will rotate. The plug has a number of holes in the top, within each hole there is a small metal cylinder known as a key pin. Each key pin is a different height, and this will correspond to the profile of the key.
Within the housing of the lock we find a number of chambers which align with the holes on the plug.
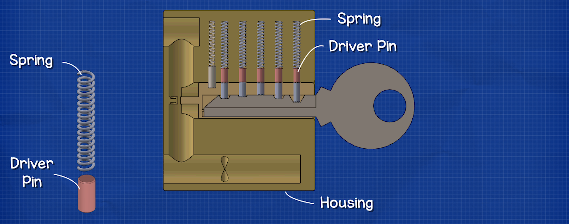
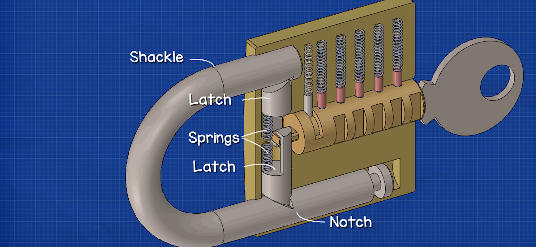
Within each chamber we find a spring which pushes another pin, known as a driver pin.
The spring pushes the driver pin into the corresponding hole of the plug until it touches the key pin. This also ensures the driver pin remains in contact with the key pin even when the padlock is rotated upside down.
The intersection between the plug and the lock housing is known as the shear line. With no key inserted, the driver pins sit part way in the housing chamber and part way within the plug. This means the plug is unable to rotate.
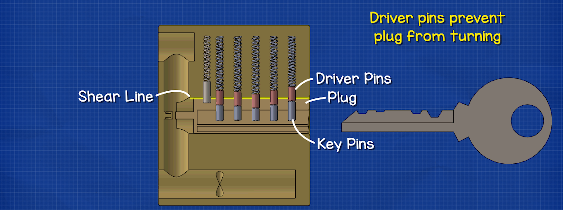
When a key is inserted into the lock, the key pins will follow the profile of the key and move up and down until the key is fully inserted. Once fully inserted, if the correct key has been used, then the top of each key pin will align with the shear line. The driver pins will have been pushed up and will now fully sit within the housing while the key pins sits fully within the plug. This means the plug is now able to rotate. If the wrong key is inserted then the pins will not align and the plug will be unable to rotate.

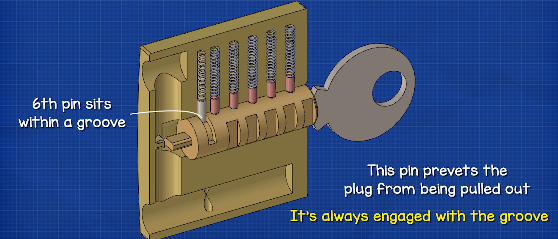
Notice this lock has 6 spring loaded chambers. Only 5 of these are used by the key to form part of the lock. But the 6th driver pin sits within a deep groove and is not used by the key. Instead, this pin is preventing the plug from being pulled out of the lock body and it does that because it is always engaged into the groove in both the locked and unlocked position.
So, once we have the correct key and we can rotate the plug, we now need a way to release the shackle whilst ensuring it can’t be removed without the key.
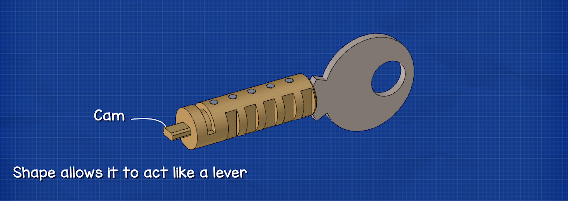
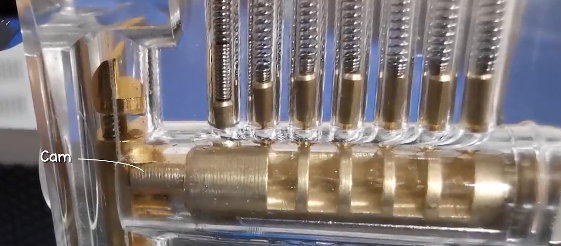
At the end of the plug we have a cam. This is just a piece of metal that extends off the body of the plug but it has this shape to it that allows it to act like a leaver.
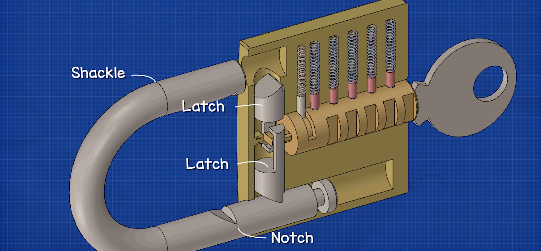
Surrounding the cam is a latch, placed on either side. The outermost ends of the latches are angled and will fit into the notches of the shackle. A spring sits inside the lock and will push against each latch, forcing it outwards so that the angled edges will be forced into the notch. This interlocking of the latch and notch prevents the shackle from being pulled out.
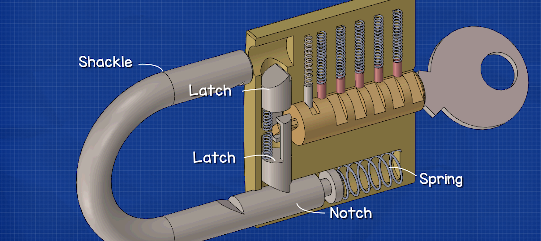
The innermost end of each latch has a small arm which extends out and rests against the flat edge of the cam. One latch rests against the top and the other rests against the bottom. When the cam rotates its shape causes the latch arms to pull inwards against the spring, detaching them from the notches on the shackle.

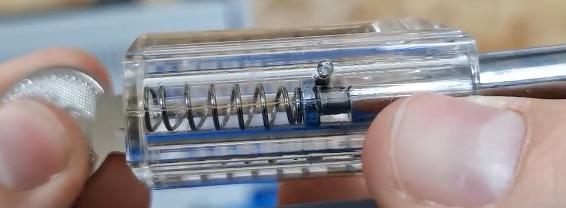
The shackle can be lifted out at this point, but to make it easier to use, a spring is placed under the longest end of the shackle, within the lock main body. This will push the shackle out making it easier to use, but also letting us visually tell if the lock is unlocked or locked.
So to recap on the operation of a padlock.
The key is inserted into the plug. The different sized key pins rest inside a number of holes inside the plug and will move up and down to follow the profile of the key. If the correct key is inserted then the top of the key pins will align with the top of the plug. This pushes the driver pins out of the plug holes and into their respective chamber. The springs ensure the driver pins will be forced into the holes if the wrong key, or if no key, is inserted.
With all the pins cleared, the key can rotate the plug. At the end of the plug is a cam which also rotates with the plug. This connects with the arms of the two latches. The latches are pushed outwards by a spring, this pushes the arm against the cam but also pushes the latch into a notch on the shackle preventing the lock from opening without the key. With the correct key inserted the plug is free to rotate, this rotates the cam which pulls the latches inwards against the spring, releasing the shackle. A spring within the shackle chamber pushes the arm outward releasing the lock.
Pick a Lock
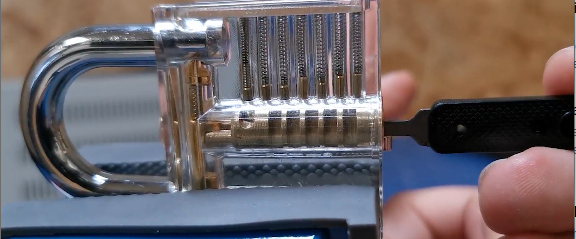
So now that you understand how the padlock works, we can understand how to bypass the security mechanisms. The most import part is that the internal pins align with the shear line. So for that we need a lock picking kit.

If you want to clearly understand the mechanism of how locks work as well as how to pick a lock, then you can buy one of these transparent locks, these clearly show you the pins of each chamber as well as how the components work together as you lock and unlock it. You can buy it HERE.
If we look through the key hole we can see the key pins inside the plug and the driver pins pushing down against these.

From the side we see the spring loaded latches engaged with the notches in the shackle, which prevent the lock from unlocking without the key. The shackle spring is also fully compressed.

As we insert the key we can see the pins move up and down, following the profile of the key. With the key fully inserted we have all 6 key pins aligned with the shear line, so with a little twist we disengage the lock mechanism. Notice as we continue to rotate the key, we can see the cam on the end of the plug moving the arms of the latches. Which pulls the them inwards, away from the shackle notches and this disengages the lock.
With the plug rotated in the unlocked position we can see the key pins inside the plug and the driver pins in their spring loaded chambers.
The shackle is pushed out by the internal spring. A groove is cut into the shackle arm and a bar within the locks body passes through this space preventing the shackle from fully leaving.
So, to unlock the device we need to move the pins to the shear line and also rotate the plug.
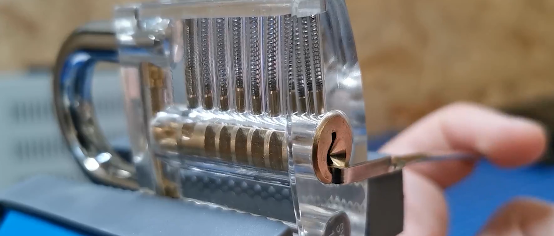
To do that we inset the torque wrench into the lock and apply a rotational force. Then using a hook we nudge each keypin until it lifts the corresponding driver pin to the shear line and as we complete the set of pins we will feel the lock mechanism disengage and the shackle pops out. Notice only 5 of the 6 spring loaded chambers needs to be nudged, the last chamber doesn’t move up and down with the key and we don’t need to nudge this because it is simply there to prevent the plug from being pulled out of the lock body.

We can also pick the lock a lot faster by again applying a rotational force to the plug and then fully inserting the hook and quickly scraping across the pins to catch them at the shear line to unlock the device.
And If you want to unlock the power of the web, then checkout squarespace.com to create your own online web presence which is packed with features to empower individuals to launch, share and promote their own projects.
There’s powerful blogging tools to showcase your projects photos, videos and progress updates.
You can easily schedule appointments for classes and sessions with team members and clients all through their built in tool. And you can even collect payments or donations to help support your cause.
Head to squarespace.com for a free trial, and when you’re ready to launch, go to squarespace.com/engineeringmindset to save 10% off your first purchase of a website or a domain.


")
")


")

")
