Learn the basics of how diodes work as well as why and where we use them.
Scroll to the bottom to watch the YouTube tutorial.
What is a Diode
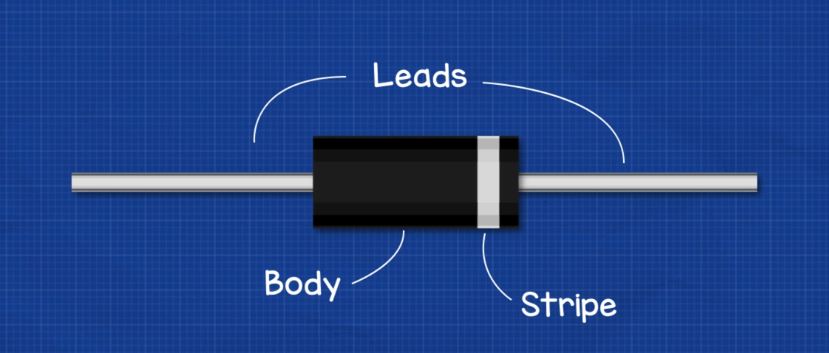
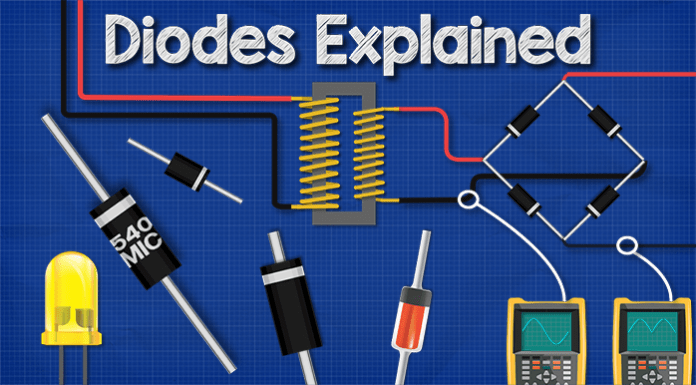
A diode looks something like the image above and comes in different sizes. They typically have a black cylindrical body that has a stripe at one end as well as some leads coming out to allow us to connect it into a circuit. This end is known as the anode and this end is the cathode and we’ll see what that means later in the video.
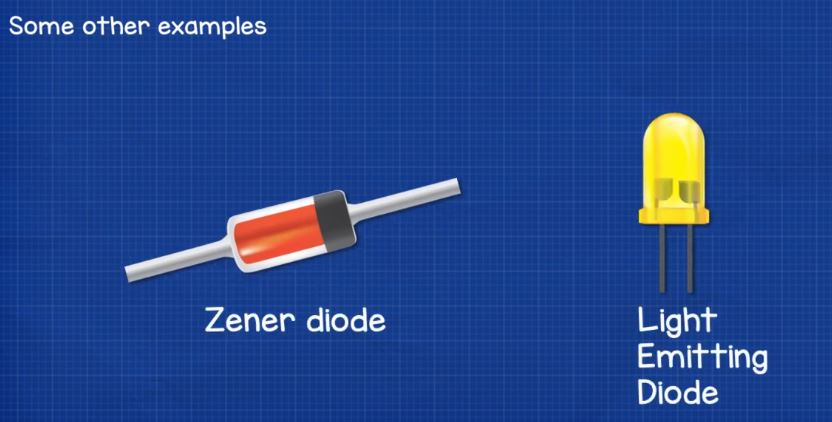
You can also get other forms such as a zener diode or even an LED which is a light emitting diode, but we’re not going to cover those in this article.
A diode allows current to flow in only one direction.
If we imagine a water pipe with a swing valve installed. As water flows through the pipe it will push open the swing gate and continue to flow through. However, if the water changes direction, the water will push the gate shut and be prevented from flowing. Therefore water can only flow in one direction.
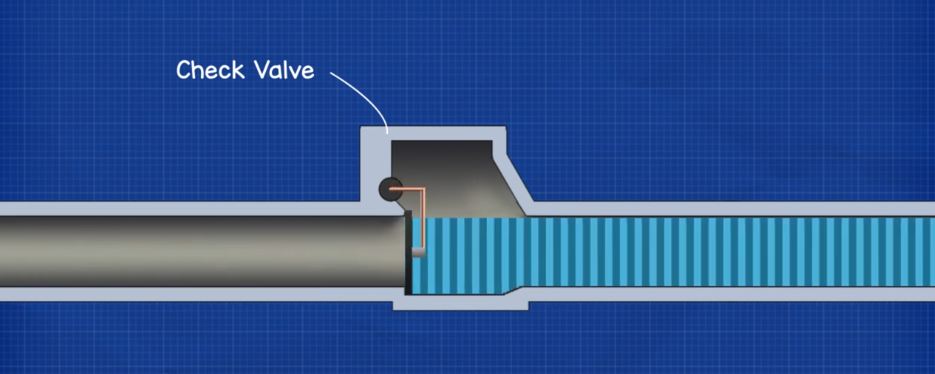
This is very similar to a diode, we use them to control the direction of current in a circuit.
Now we’ve animated this using electron flow, which is where electrons flow from the negative to the positive. However, in electronics engineering, it’s tradition to use conventional flow which is from positive to negative. Conventional current is probably easier to understand, you can use either it doesn’t really matter but just be aware of the two and which one we’re using.

So if we connect a diode into a simple LED circuit like the one above, it must be noted that the LED will only turn on when the diode is installed correctly. It allows current to flow in only one direction. So depending on which way it is installed it can act as a conductor or an insulator.
The striped end is connected to the negative and the black end is connected to the positive in order for it act as a conductor. This allows current to flow, we call this the forward bias. If we flip the diode it will act as an insulator and current can’t flow. We call this the reverse bias.

How Does a Diode Work?
As you may know, electricity is the flow of free electrons between atoms. We use copper wires because copper has lots of free electrons which makes it easy to pass electricity through. We use rubber to insulate the copper wires and keep us safe, because rubber is an insulator which means its electrons are held very tightly and can’t therefore move between atoms.
If we look at a basic model of an atom of a metal conductor, we have the nucleus at the centre and this is surrounded by a number of orbital shells which hold the electrons. Each shell holds a maximum number of electrons and an electron has to have a certain amount of energy to be accepted into each shell. The electrons located farthest away from the nucleus have the most energy. The outermost shell is known as the valence shell and a conductor has between 1 and 3 electrons in its valence shell.
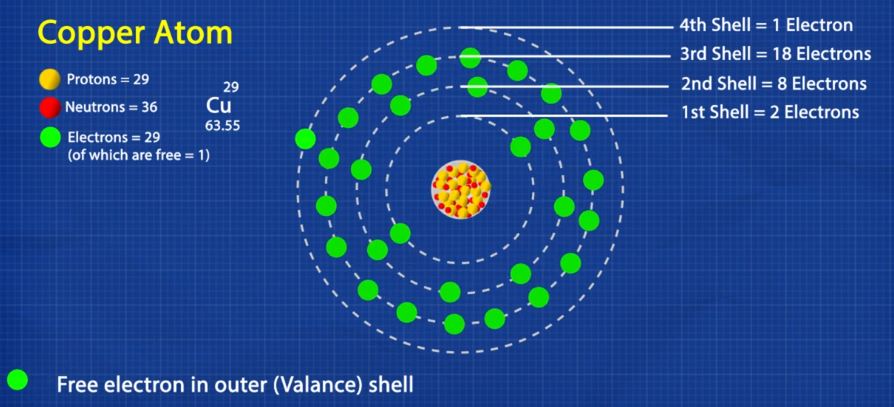
The electrons are held in place by the nucleus. But there’s another shell known as the conduction band. If an electron can reach this then it can break free from the atom and move to another. With a metal atom such as copper, the conduction band and the valence shell overlap so it’s very easy for the electron to move.
With an insulator, the outermost shell is packed. There’s very little to no room for an electron to join. The nucleus has a tight grip on the electrons and the conduction band is far away, so the electrons can’t reach this to escape. Therefore electricity cannot flow through this material.
However, there’s another material known as a semiconductor. Silicon is an example of a semiconductor. With this material there’s one too many electrons in the outermost shell for it to be a conductor so it acts like an insulator. It must be noted however; that as the conduction band is quite close; if we provide some external energy, some electrons will gain enough energy to make the jump from the valance and into the conduction band to become free. Therefore this material can act as both an insulator or a conductor.
Pure silicon has almost no free electrons, so what engineers do is dope the silicon with a small amount of other materials to change its electrical properties.

We call this P-type and N-type doping. We combine these doped materials to form the diode.
So inside the diode we have the two leads, the anode and the cathode which connect to some thin plates. Between these plates we there is a layer of P-Type doped silicon on the anode side and a layer of N-type doped silicon on the cathode side. The whole thing is enclosed in a resin to insulate and protect the materials.
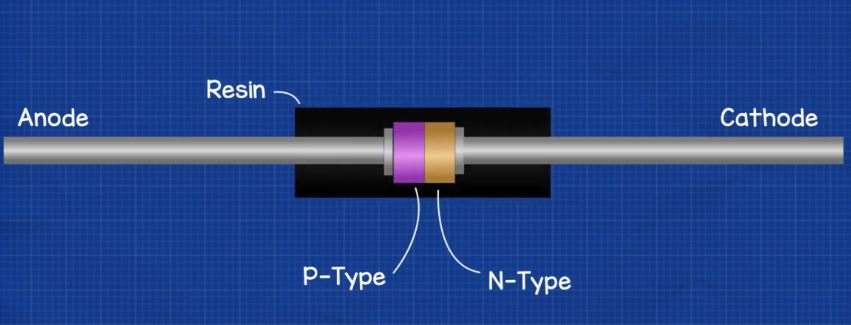
Let’s imagine the material hasn’t been doped yet so it’s just pure silicon inside. Each silicon atom is surrounded by 4 other silicon atoms. Each atom wants 8 electrons in its valence shell but, the silicon atoms only have 4 electrons in their valence shell, so they sneakily share an electron with their neighbouring atom to get the 8 they desire. This is known as Covalent bonding.

When we add in the N-type material such as phosphorus, it will take the position of some silicon atoms. The phosphorus atom has 5 electrons in its valence shell. So as the silicon atoms are sharing electrons to get their desired 8, they don’t need this extra one, so there’s now extra electron in the material and these are therefore free to move.
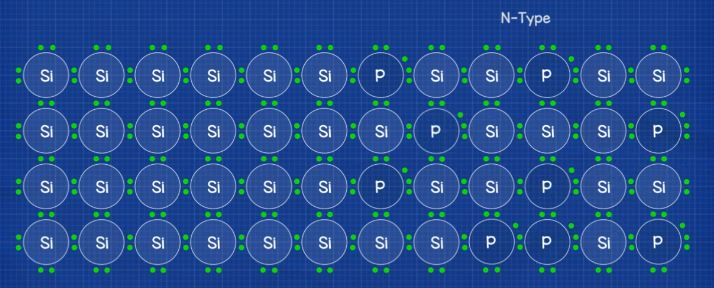
With P-type doping we add in a material such as aluminium,. This atom has only 3 electrons in its valence shell so it can’t provide it’s 4 neighbours with an electron to share, so one of them will have to go without. There is therefore a hole created where an electron can sit and occupy.
So we now have two doped pieces of silicon, one with too many electrons and one with not enough electrons.
The two materials join to form a P-N junction. At this junction we get what’s known as a depletion region. In this region, some of the excess electrons from the N-type side will move over to occupy the holes in the P-type side. This migration will form a barrier with a buildup of electrons and holes on the opposite sides. The electrons are negatively charged and the holes are considered therefore positively charged. So the build up causes a slightly negatively charged region and a slightly positively charged region. This creates an electric field and prevents more electrons from moving across. The potential difference across this region is about 0.7V in typical diodes.
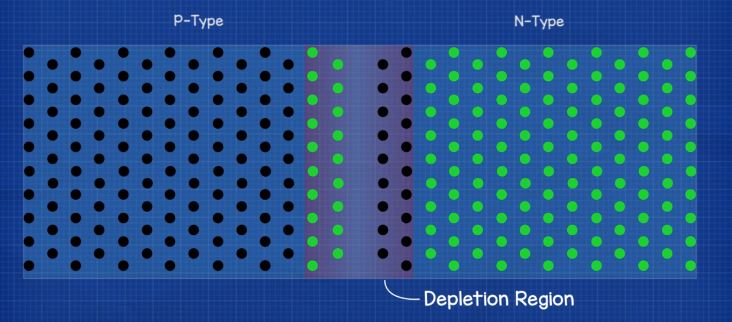
When we connect a voltage source across the diode, with the anode (P-Type) connected to the positive and the cathode (N) connected to the negative, this will create a forward bias and allow current to flow. The voltage source has to be greater than the 0.7V barrier otherwise the electrons can’t make the jumper.
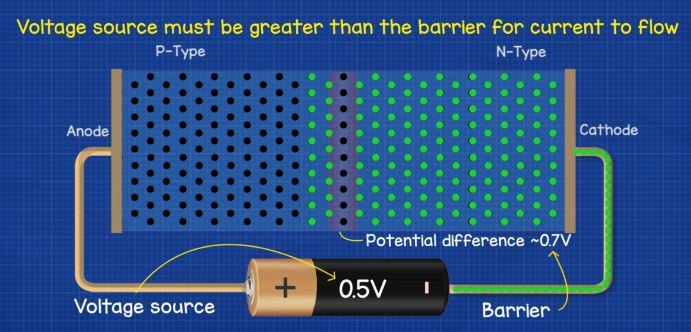
When we reverse the power supply so the positive is connected to the N-type cathode and the negative is connected to the P-type anode. The holes are pulled towards the negative and the electrons are pulled towards the positive which causes the barrier to expand, and therefore the diode acts as a conductor to prevent the flow of current.
Technical Details

Diodes are represented in engineering drawings with a symbol like the image above. The stripe on the body is indicated with a vertical line on the symbol and the arrow points in the direction of conventional current.
When we look at a diode we see these numbers and letters on the body. These identify the diode so you can find the technical details online.
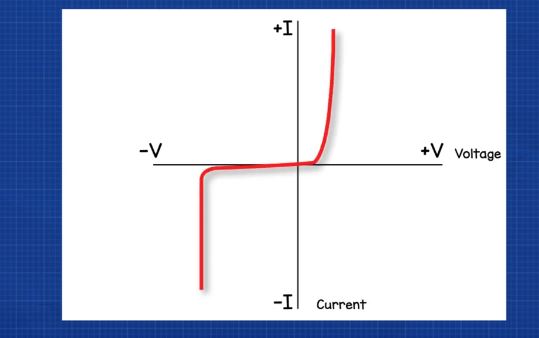
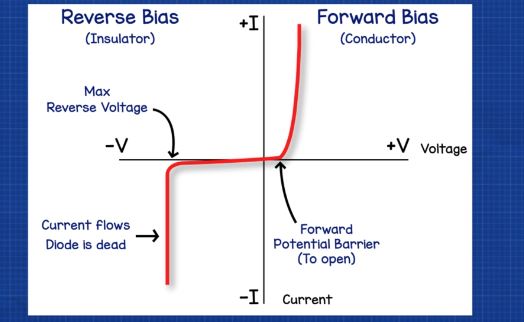
The diode will have an I-V diagram that looks like above. This diagram plots the current and voltage characteristics of a diode which is plotted to form a curved line. This side is how it should perform when acting as a conductor and this side is when acting as an insulator.
You can see that the diode can only act as an insulator up to a certain voltage difference across it, if you exceed this, then it will become a conductor and allow current to flow. This will destroy the diode and probably your circuit, so you need to make sure the diode is sized correctly for the application.
Equally, the diode can only handle a certain voltage or current in the forward bias. The value is different for each diode, you’ll need to look up this data to find the details.
The diode requires a certain voltage level to open and allow current to flow in the forward bias. Most are around 0.6V. If we apply a voltage less than this, it will not open to allow current to flow. But, as we increase past that, the amount of current that can flow will rapidly increase.
The diodes will also provide a voltage drop into the circuit. For example when I added this diode into a simple LED circuit mounted to a breadboard, I get a voltage drop reading of 0.71V.
Why We Use Them
As mentioned we use diodes to control the direction of current flow in a circuit. That’s useful for example to protect our circuit if the power supply was connected back to front. The diode can block the current and keep our components safe.
We can also use them to convert AC to DC. As you might know AC or alternating current moves electrons forwards and backwards creating a sine wave with a positive and a negative half, but DC or direct current moves electrons in just one direction which gives a flat line in the positive region.
If we connect the primary side of a transformer to an AC supply and then connect the secondary side to a single diode, the diode would only allow half the wave to pass and it would block the current in the opposite direction. So the circuit experiences only the positive half of the cycle so it’s therefore now a very rough DC circuit although the current pulsates, but we can improve this.

One way to do that is if we connected four diodes to the secondary side, we create a full wave rectifier. The diodes control which path the alternating current can flow along by blocking or allowing it to pass. As we just saw the positive half of the sine wave is allowed to pass but this time the negative half is also allowed to pass, although this has been inverted to turn it into a positive half also. This gives us a better DC supply because the pulsating has greatly reduced. But we can still improve this further, we simply add in some capacitors to smooth out the ripple and eventually get it into a smooth line to closely mimic DC.
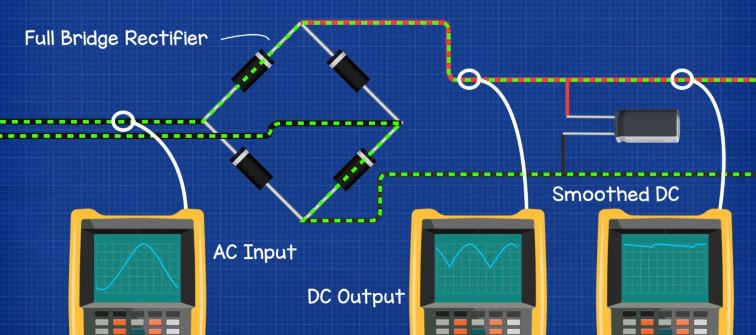
We’ve covered how capacitors work in detail in our previous article, do check that HERE.
How To Test a Diode
To test a diode, we will need a multimeter with a diode test setting, the symbol will look like this. We highly recommend you have a good multimeter in your toolkit to help you learn as well as diagnose problems.
So we take our diode and multimeter. We connect the black wire to the end of the diode with a line. Then we connect the red wire to the opposite end. When we do this, we should get a reading on the screen.
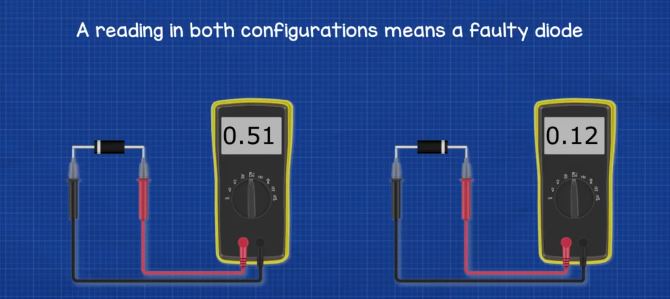
For example this model 1N4001 diode gives a reading of 0.516V. This is the minimum voltage it takes to open the diode to allow current to flow.
If we now reverse the leads connected to the diodes, we should see OL on the screen which means outside limits. That’s telling us that it’s not able to make a measure, that’s a good thing because it measure it can’t complete the circuit so the diode is doing it’s job.
If we get a reading connecting on both configurations, then the component is faulty and shouldn’t be used.
To test a diode in a circuit for voltage drop, we simply move the multimeter into the DC voltage function and then place the black probe to the stripe end and the red probe to the black end. This will give us a reading for example of 0.71V which is the voltage drop.










much helpful
[…] 👓 Check this article: https://theengineeringmindset.com/the-basics-of-diodes-explained/ […]
[…] have covered inductors, diodes and transistors in detail in our previous articles HERE- Inductors, Diodes, […]
Most helpful
Is this sentence correct?
“The holes are pulled towards the negative and the electrons are pulled towards the positive which causes the barrier to expand, and therefore the diode acts as a conductor to prevent the flow of current.”
It seems that with the depletion zone now expanded, the diode should be acting as an “insulator” to prevent the flow of current.