

Learn how solar panels work and unravel the mysteries of how solar power works. We’ll discuss the different types of solar panels, how solar power works, the different solar panels for homes, the efficiency of solar panels and a deep dive into how solar cells work.
Sponsored by PVCase, check them out 🎁➡️ https://pvcase.com/engineeringmindset
Scroll to the bottom to watch the YouTube tutorial!
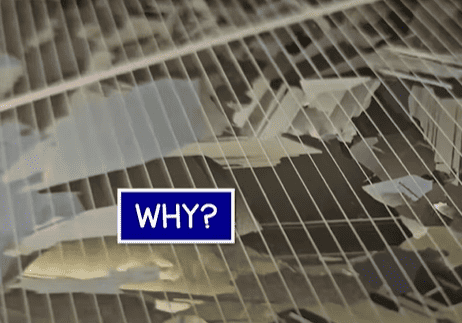
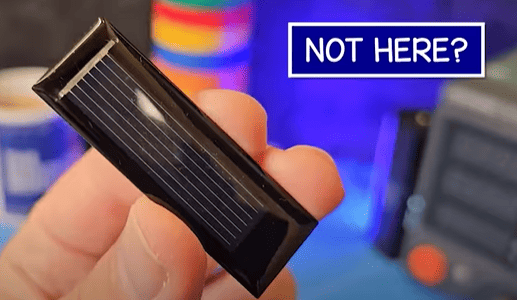
Why are there crystals here but not on this one? And how do solar panels even work? Let’s find out.
You can now buy a mug and a hoody to help support us HERE.
Solar panels convert light into electricity. They are Photovoltaic, meaning light and voltage.
It works with sunlight or artificial light.
Take a small solar cell, setup your multimeter, connect the leads and expose it to some light. We instantly see a voltage is generated. The stronger the light, the more electricity is produced.
But, can this be reversed?
If we connect the solar cell to a power supply, it produces infrared light. The human eye can’t see this, BUT if we take a camera and remove the filter; we can then see that light is being produced from the cell.
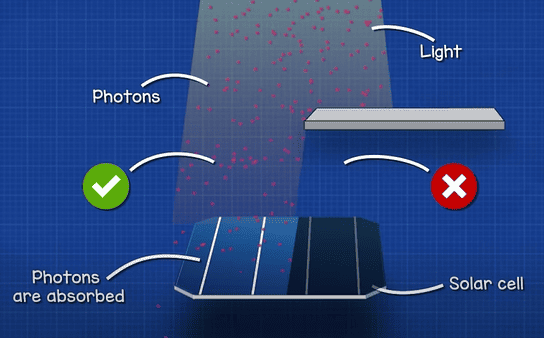
Light is basically just lots of particles called photons. The solar cell absorbs these photons. When they hit the solar cell, they knock another particle called an electron out of the solar cell, leaving a hole behind. This is the photovoltaic effect. I’ll explain in detail how it works later in the article.
But, the hole drifts down to the bottom and the electron is pulled into the top layer.
The electron is attracted to the hole, similar to how opposite ends of a magnet attract. If we provide a path using a wire, the electron will flow through this to get back to the hole. We place things such as LED’s in the path, and that way the electron has to flow through them causing it to emit light. Which means it emits photons.

So, if the LED emits photons, and the solar cell absorbs photons, then can the LED power itself?
You have probably seen solar cells on your calculator, or garden lights, they’re often used on motor homes and boats. We see them on houses and even vast solar arrays in fields.
An array is just multiple strings of solar modules connected together.
A string is just multiple solar modules connected together
A solar module is just multiple solar cells connected together.
To make a basic solar cell, we start with a metal conductive plate, this forms the positive electrode.
On top of this we find a thin silicon layer. This is our semiconductor material. Typically, this consists of a layer of silicon boron mixture on the bottom and a layer of silicon phosphorus on top. The joint between them is known as the PN junction.
On top of the silicon we have an anti-reflective coating.
A metal grid is then placed over this, which is our negative electrode. The thin strips are known as fingers and the thicker strip is known as the bus bar. We typically have a glass protective layer over this because solar cells are very thin and will easily break, so we need to protect them.
This tiny cell has the busbar at the very edge. This one is through the middle. These large ones have multiple bus bars through the middle. They all have fingers reaching out across the silicon to collect the free electrons. These electrons will flow along the fingers, then collect and flow together in the bus bars.
We need as much light as possible to enter the silicon, so the metal conductors need to be as thin as possible. More fingers makes it easier to collect electrons, but it also blocks light.
The silicon material is shiny, which means light is reflected away. So, the anti-reflection coating helps reduce this, but some will always be reflected.
We also find cells with this rough surface. This helps capture some of the reflected light and direct it back into the solar cell.
Each of these cells generates just 0.5 volts. But the larger the cell, the more current it can generate.
To make a solar module, we have a solid back sheet, with a layer of EVA adhesive over this and then the solar cells are stuck to this and connected together. Another layer of EVA film sits on top of this, then a layer of glass and finally the frame is fitted. On the back we have the electrical connections which connect to the cells. The EVA encapsulates the solar cells, insulating them from moisture and mechanical stress which would degrade the material over time.
Looking at the solar modules, the top of one cell is connected to the bottom of the next cell, and this increases the voltage. Looking Inside this unit we have two cells, both producing 0.5 volts. If we look closely we can see the cells overlap and join to form a series connection, the ends pass through the back where we find the electrical terminals.
Small modules use 36 cells, which produces around 18-19.8 Volts, perfect for charging a 12 Volt battery because we need more voltage than the battery to charge it. So, we often find these used for off grid systems.
But most residential installations are grid connected and use 60 or 72 cell modules.
Commercial installations typically use 60, 72 or 96 cell modules, some can be even larger.
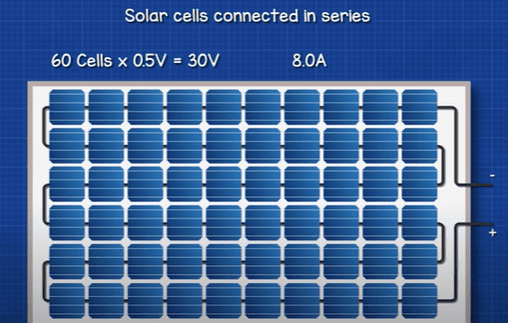
When we connect cells in series, the voltage adds together but the current remains the same. This module uses 60 cells, each providing around 0.5 volts and 8 amps of current. So, it produces around 30 volts and 8 amps. This gives us 240 Watts of power.
If we connected 4 of these modules in series, we get 120 volts and 8 amps. The voltage adds together but the current remains the same. This gives us 960 Watts.
But if we connected 4 in parallel, we get 30 volts and 32 Amps. The voltage is the same, but the current adds together. This also gives us 960 Watts.
We often use a combination of series parallel connections. The modules connect to a charge controller and inverter. These have a maximum and a minimum voltage and current to work. For example, this one might be 100 to 150 volts and 25 amps. Our string of modules has 120 volts and 8 amps, so we can’t add another string in series because we will exceed the voltage limit.
Therefore, we connect the two strings in parallel. Giving us 120 volts with 16 amps.
The system could be stand alone or grid connected.
We can use a solar panel to directly power a load. But, it only works when exposed to light. For example, this solar fan will automatically turn on when exposed to light. The brighter the light, the faster it spins. But, it doesn’t work at night.
We therefore need a battery to store the energy. It charges during the day and we can then use it at night. That’s how this very simple battery charger works.
However, the voltage and current will vary and, the solar module can overcharge the battery which will damage it. And at night time, the battery can discharge back through the solar panel. So, we separate them using a charge controller.
Now, when the sun shines, the controller charges the battery. We can switch a light on, and the controller sends power to the load with any excess energy going to charge the battery. At night time, the controller protects the solar panel from the battery but still allows us to use the energy stored in the battery. That’s how these solar powered phone chargers work.
You can see from this simple garden light, that inside we have just a solar cell connected to a basic charge controller, which separates the battery and the LED. The solar cell charges the battery and when charging stops, the light is powered. We can also control the light with the switch.
The solar panel and battery provide DC electricity. If we connect this multimeter to a battery we see a constant flat line voltage. That’s because the electrons flow in one direction, much like the flow of water down a river.
We can use this to power small DC motors, lights and USB devices. Perfect for motor homes and boats.
But many of our appliances require AC electricity which works differently. If I connect to this power socket, we have a wave pattern. The electrons are flowing backwards and forwards. It is alternating direction. Much like the tide of the sea, flowing in and out.
To power these devices we need an inverter, this will convert the DC into AC.
Inside we basically just have some electronic switches which turn on and off extremely fast to control the path of the electrons.
You can read our detailed inverter article HERE.
But using an inverter allows us to use both AC and DC devices from this system.
However, the battery will run out of energy if it isn’t recharged.
For domestic and commercial installations, we therefore often connect to the electrical grid.
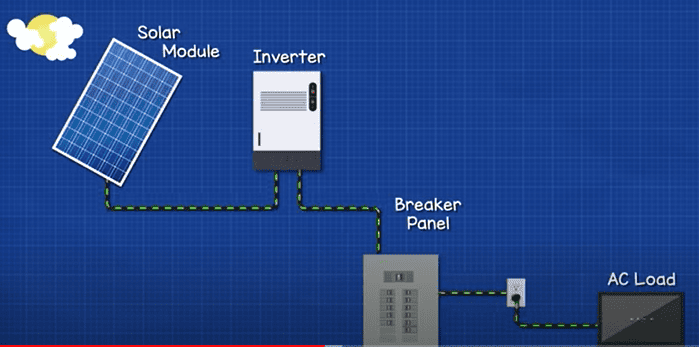
In a simple system, we just have the solar panels connected to an inverter, this feeds the breaker panel and the AC load in the property. The electrical grid connects via a meter to the panel also, the inverter must therefore synchronise with the grid. At night time, no solar energy is generated so we buy electricity from the grid. On a sunny day, the solar panels will be enough to power a few items in the home, and no electricity passes through the electrical meter. On very sunny days, the panels provide move energy than we can use within the home, so the excess is sold to the grid. This is net metering.
More advanced systems will use a battery bank which requires a charge controller. The solar modules will charge the batteries and power the appliances. When the batteries are full, the excess power is sold back to the grid. At night time the batteries power the home until empty. At this point, electricity will need to be purchased from the grid. In the event of a power cut, the batteries will power the home until they empty. In the day time they will recharge.
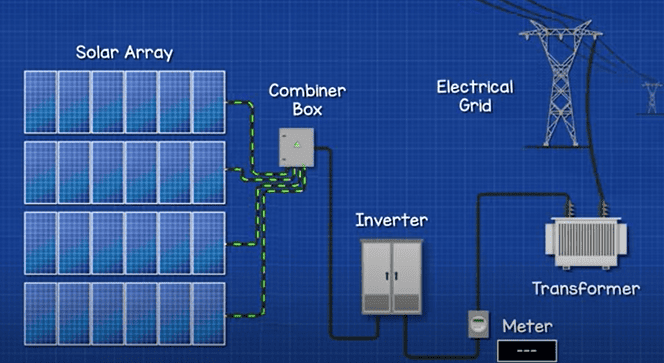
Solar farms will have multiple rows of solar panels generating much higher voltages. These will then combine and connect into a large inverter and then feed into a transformer substation. Here the voltage is increased and it is then exported to the grid.
The problem with solar is that the sun keeps moving. It moves from east to west every single day, and in the summer it’s high in the sky but in the winter its low in the sky. Assuming you’re in the northern hemisphere.
Solar panels work best when perpendicular to the sun. We can see with a torch that the light is strongest here, but as it tilts, the light is spread over a larger area so it is less intense.
Ideally, we would just move the solar panel with the sun, but this is difficult and expensive to do. So, we need to assess the location for the altitude and azimuth of the sun at that latitude, then check for any shading, and then we choose the best orientation and tilt angle for the module. This involves a lot of data tables and maths which is time consuming.
But with PVcase, our sponsor, you can simulate the actual location using their next generation AutoCAD-based PV software, which incorporates 3D topographical data points so you can prototype the design as well as the electrical cabling route and cable trays and asses the placement of the inverter. The stringing and cabling can be automated or manually designed.
And with their shade analysis you can find and remove overshadowed modules to ensure optimal sun exposure design and even compare different designs side by side, of course you can then export the projects. You can design ground and commercial or industrial roof mounted projects.
And automatically produce construction documentation as well as a bill of materials, this helps you save time from the first initial design all the way through to the procurement phase.
Perfect for large commercial, industrial or even utility scale projects.
Click HERE to learn more.
You might have noticed that solar cells look different. There are crystalline types and thin-film types.
One of the most common is the Polycrystalline cell. It typically has these blue flakes, although we can get other colours like this emerald version, the colour depends on the anti-reflection coating. These flakes are individual silicon crystals. Poly means “many” and crystalline means “crystals”. They look beautiful but each crystal is a separate group of atoms, in different orientations. The boundaries of the crystals are defects and they reduce the efficiency of the cell.
These are very common for hobby electronics, solar powered products and also in solar panels. They are relatively cheap but have an efficiency of around 13-17%.
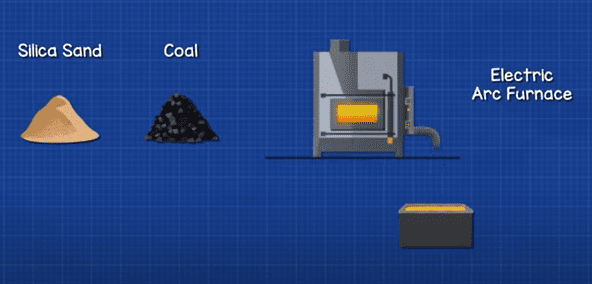
To make them, we basically take some silica sand and some carbon such as coal and melt it in an electric arc furnace, it cools down and forms large chunks of raw silicon. This is a piece of raw silicon in my hand. It is very light weight and you can see its very shiny. You can buy them HERE.
These chunks are crushed to a powder, mixed with hydrogen chloride and boiled into a gas. The gas is distilled to remove the impurities, it then enters a reactor and slowly collects on the surface of rods forming pure silicon. The pure silicon rods are broken up, melted and cooled to form ingot blocks. As the material cools, the atoms join and form crystals. The blocks are then cut up into thin sheets and used as solar cells.
This is a monocrystalline cell, it is rigid and it typically has a black or very dark blue colour, with no visible crystals. Mono means one. The atoms form a very orderly structure.
Monocrystalline is more efficient, around 15-19% but also more expensive to produce as it’s more refined.
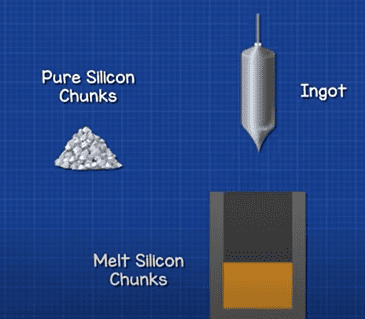
The pure silicon chunks are placed into a crucible and melted. A seed crystal Is lowered into this and the silicon atoms stick to it, this is slowly extracted and it cools to form an ingot. The atoms structure themselves perfectly in this process forming one giant crystal. The ingot is then cut into blocks and then into thin slices. To form the solar cells.
We can also get thin-film types, this monocrystalline version is flexible, so is this polycrystalline version. They are often used for curved roofs of vans and boats. It has a shorter lifespan and is less efficient.
This garden light and this calculator use thin-film amorphous silicon which have this brown colour. The atoms have a random structure, with no defined pattern.
These are very cheap to produce but only around 5-8% efficient.
When we talk about efficiency, we mean the energy from the sun and how much is converted into electricity. The energy travels in waves. The waves are different sizes from tiny but high energy Gama rays to large low energy radio waves. But most of its emitted energy is in the ultraviolet, visible and infrared region.
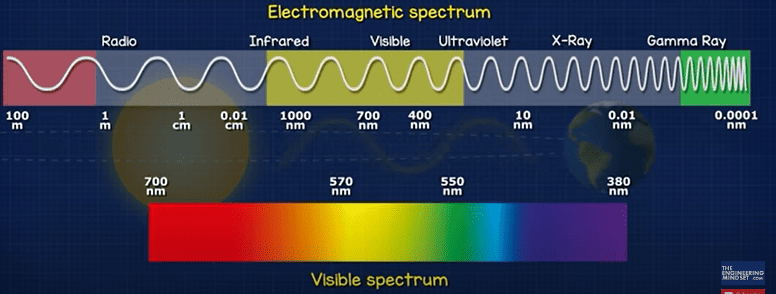
The visible spectrum is what the human eye can see. The wavelength determines what colour light the eye will see.
If we measured the energy per area by wave length in space, we see a curve like this. But down at sea level it looks more like this, because the atmosphere has absorbed and deflected some of the energy.
Remember, inside the solar cell, we need a photon to knock an electron off the silicon atom.
We use silicon because the electron in the outer valance band only needs to receive around 1.1 electron-volts to make the jump to the conduction band and become free from the atom.
That is equal to a photon with a wavelength of around 1,127 nanometres. Which is here on the spectrum. Any wave length beyond this can’t therefore be used to generate electricity with this material. But all the wavelengths below this can be used.
However, these wavelengths have more energy than is needed and so the excess energy is wasted by heating the solar cells.
So there’s only around 30% energy left that can actually be used to generate electricity with silicon. Some of this energy will be reflected away, dust and dirt on the solar panel will also block some energy and additionally, as solar cells heat up from the wasted energy, their efficiency decreases.
And after we have generated all that energy, we then also have energy losses from the inverter and also the wires.
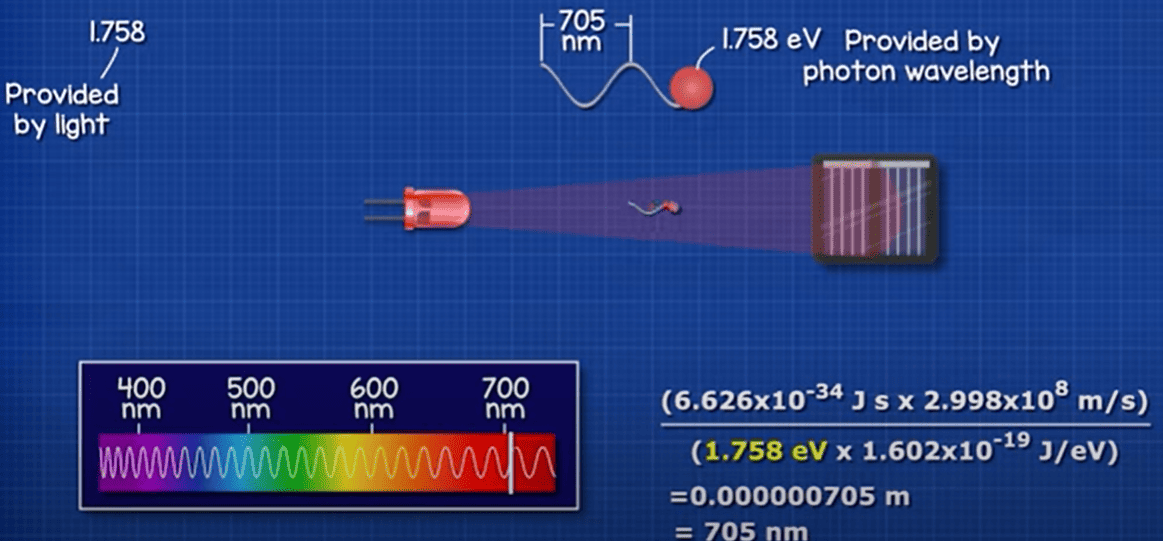
So this red LED can’t power itself. It has a wave length of around 705 Nano meters, providing 1.75 electron volts. We only need 1.1, the rest of this energy will be wasted as heat.
To produce that light, we are consuming 4 milliwatts and only around 10% of that is converted back into electricity. So we would need around 10 LED’s to power just 1 LED.
I tried it here, and 9 LED’s is just enough to produce light.
LED’s also use silicon. So do diodes. A solar cell is basically a giant flat LED working in reverse. We can actually shine light into an LED and it will produce a voltage.
Check out our LED video HERE to learn how they work.
When we look at silicon atoms, they have 14 electrons, with 4 in its outermost shell, known as the valance shell. Silicon atoms are most stable when they have 8 electrons in the valance shell, but they only have 4. So, they will share an electron with each of their neighbours to achieve this.
Where do the free electrons and holes come from?
For the electrons, we add some Phosphorous to one side because it has 5 electrons in the outermost shell. 4 of these will be shared and there is now 1 spare electron that is free to move around.
For the holes, we add some Boron to the other side because it has just 3 electrons in the outermost shell. There aren’t enough electrons to share, so there is now a hole where an electron can occupy.
We now have a layer with too many electrons and also a layer with no enough electrons. This joins to form the PN junction. N stands for negative, because the electrons are negatively charged. P stands for positive because the holes are therefore considered positively charged.
At this junction we get a depletion region. Some of the electrons move across and some of the holes also move across. But this will form a barrier with a slightly positively charged region and a slightly negatively charged region.
This creates an electric field which prevents more electrons or holes from moving across. And that is what forms the depletion region, where no free electrons or holes can exist.
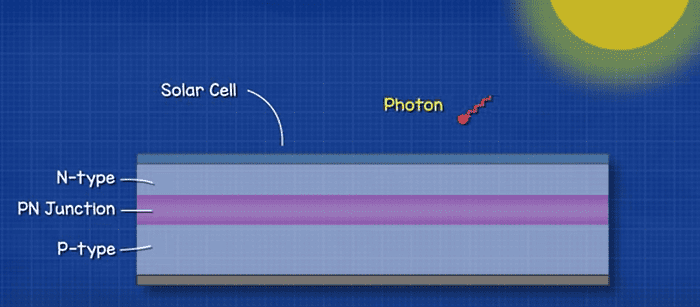
When light shines on the solar cell, the photons penetrate through the thin N-type layer and reach the PN junction. If the photon has enough energy, it can knock an electron off an Atom in this region, setting it free and leaving an electron hole behind. Remember, no free electrons or holes can exist in this depletion region, so the electric field pulls the free electron up into the N-type layer.
The atoms share electrons so another will move from the P-type layer to fill the hole, but this just leaves another hole behind it. This is also quickly filled and so the hole drifts down through the P-type layer.
A large amount of electrons and holes build up in the two materials at the terminals, this causes a build-up of positive and negative charge, this is what creates voltage.
The free electrons are attracted to electron holes. Think of them like opposite ends of a magnet, attracted together.
So, if we provide a path, the electrons will flow through the wire to get to the other side of the solar cell where it can re-combine with a hole.
The light hitting the solar cell will cause a vast amount of electrons to break free, these all flow through the wire and a current develops. As soon as light hits the solar cell, electrons will flow continuously. We have therefore generated DC electricity. And that is how a solar cell works.
")
")


")

")

