

In this refrigerant retrofit guide we will be looking at how to retrofit a refrigeration system with the new, environmentally friendly, refrigerants that are coming into the market due to the changes to laws and regulations on the types of refrigerants that can be used. You can watch a video on this subject at the bottom of this article.
For further information on this subject I would recommend visiting the Danfoss website. Danfoss is your go-to source for information and resources that can help you through the cooling industry’s transition to natural and climate-friendly refrigerants. They have a deep understanding of all the new regulations and their effects, and they’re ready to share their knowledge and solutions with you. They’ve also made helpful tools like their refrigerant retrofit guide, Low-GWP Tool, and Coolselector 2 app available for free on their website. You can access them now by visiting Refrigerants.Danfoss.com.

Firstly the reason the laws and regulations are tightening on refrigerants is all due to the damaging effects the previous generations of refrigerants had on the environment. The first generations of refrigerants were found to have burnt a hole in the Ozone layer and the later types of refrigerants are being phased out due to their global warming potential. We covered the basics of this in our previous article which you can read here or watch the video lecture.
One of the downsides to retrofitting a system with a new refrigerant is that there will be a compromise on system performance and efficiency. The system was originally designed to handle another type of refrigerant which has unique thermodynamic properties. Ideally, the entire system would be replaced to suit the new refrigerant and provide the ultimate performance, however, this is not always possible mainly due to financial constraints and many businesses will want to maximise their initial investment. When this is the case, the only option is to then retrofit in order to comply with the new laws and regulations.
The cooling capacity will change with the use of a new refrigerant, so you’ll need to check that the new cooling capacity will be capable of meeting your demands.
Checking compatibility
Before retrofitting a system, you will have to assess the components to ensure it will be compatible with a new type of refrigerant. For all the items listed below, it is essential that you record the manufacturer, model and serial number from the components data plate. Once you have obtained this information you should contact the supplier to discuss compatibility options. If you have a package unit this should be a straight forward task, however, if your system is custom made or has many replacement components then it can be quite time consuming so contact a specialist such as Danfoss.
While searching around the system for data plates, you should record the normal operating conditions of the system by recording the pressure and temperature of the refrigerant from as many parts of the system as possible. Pay particular attention to the suction and discharge line, the evaporator and condenser, the superheat as well as the compressor Amps. You’ll need to use this data to calibrate your new refrigerant.
Compressor: The first first component to check is the compressor. The compressor is the heart of the system which forces the refrigerant to move around between all the major components. It’s also the most expensive component and where almost all of the electricity will be consumed so it’s important to get this right. You’ll want to know the pressure and temperature limits of the compressor be ensure it will be able to cope with the new refrigerant. Additionally the oil used by the compressor will likely need to be changed to suit the new refrigerant.
Condenser: The condenser is where all the unwanted heat will be rejected from. Remember this will need to reject all the heat from the evaporator as well as the heat produced by the compressor. You’ll need to check the condenser will meet the capacity of the compressor. If the replacement refrigerant has a high glide then the condenser may need an increase in the surface area to suit the lower mean temperature difference.
Expansion device: If your system utilises a thermostatic expansion valve, which most will, then the expansion valve will likely need to be replaced as it will not be compatible with the new refrigerant. The general rule of thumb is that if you compare the two refrigerant charts and there is a 3K difference in the pressure – temperature chart, then you will have to replace the valve. If it is under this value, then you might be able to adjust this if you have the ability to. You’ll also wants to ensure that any other valves used in the system, such as pressure control valves, will be able to cope with the new refrigerant and you will likely need to adjust these to suit also.
Evaporator: If the new refrigerant is a high glide type, then this may cause a higher de-humidification rate as parts of the evaporator will have a lower temperature.
Valves and gaskets: Unfortunately any gasket used around the system such as those used on the solenoid valve, schrader valves and o rings, will have to be replaced with new ones becuase the current oil/refrigerant will have caused the gasket to swell and when the refrigerant and oil is replaced the gasket will start to leak. Additionally the replacement oil can react with these components and break down the material.
Lubrication oil: he oil you currently use in the system is also going to need to be replaced and its good practice to change the oil filters as well, if your system has these. For this you’ll need to decide which retrofit refrigerant you will be using and find the corresponding, compatible, oil recommended by the supplier. It is essential that you check this oil is compatible with the compressor.
Pipework: The pipework will also need to be assessed as the refrigerant used will likely have a different density and enthalpy which will result in different velocities and also pressure drop. The suction line and oil return lines are of particular importance.
Controller: The controller may also need to be adjusted especially for the superheat as this will change with the refrigerant also.
Which refrigerant can your system move to?
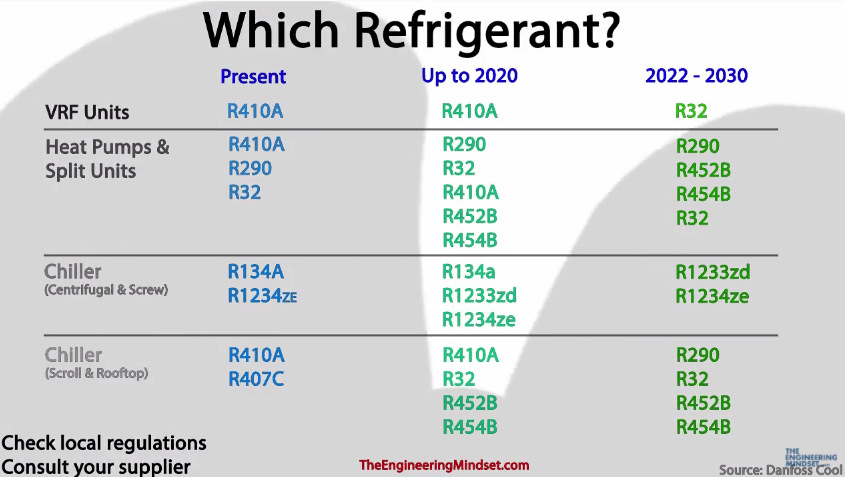
The refrigerant you will need to migrate over to, will depend on two things.
- What type of system you have
- How long the system will be operational for
In the illustration you can see some examples of how that might look going forward. Check with you suppliers and specialists for more information. Consult local laws and legislation also to see how you should comply.
How to retrofit the refrigerant
- Recover oil from the system, refill with new
You’ll want to drain the oil from the compressor as well as the oil separators and accumulators. Remember to record the quantity of oil recovered. Speak to your refrigerant supplier as they should be able to help you dispose of this safety since it will likely contain small quantities of refrigerants.
2. Recover the refrigerant
You will need to recover the refrigerant and record its weight. If you’re not suitably trained and competent to do this then do not attempt to and leave it to a qualified professional. Refrigerants can be dangerous and there are huge penalty fines if you release the refrigerant into the atmosphere.
3. Change the components such as TXV, O-Rings, filters
Replace the seals and components, such as expansion valve and filters. Adjust the settings for the new refrigerant pressure. Remember to include the safety valves and control valves.
4. Evacuate the system and leak test
Evacuate the system to remove all air, moisture and other contaminants. Perform a leak detection test to ensure your system is sealed. Isolate the vacuum pump, if it doesn’t hold its pressure, then you have a leak.
5. Refill system with new refrigerant
Recharge the system with the new refrigerant. Speak with the refrigerant supplier as they will guide you on the initial charge size. Remember if you are using a blended refrigerant then you will have to charge the system in the liquid state.
6. Monitor and adjust the system
Test the new system by starting it and monitoring performance. Adjust the refrigerant charge if needed. Remember the performance will not be the same with the new refrigerant. Check the oil and filters as this will return any dirty picked up around the system. Verify the superheat setting.
Now don’t forget to complete the paperwork and label the system with the new type of refrigerant used.


")

")

What is inside feeler bulbi
Thanks for big info..more power..